Before I begin, I will make some things clear. This is but a small portion of what makes up drawing a horse. As example I have used a Friesian horse. These horses have a very distinctive appearance, which means the shape of its face will not apply for most other horses. Like some other horse breeds, the Friesian has a somewhat longer shaped head, profound but relatively small eyes, and a strong, thick neck. There are also some distinctive features to their body shape that doesn't apply to the drawing I will use as model. Also I would like to point out that these horses have a lot of mane that is luxuriant and flowing.
Another note I would like to express is that I have drawn a lot of horses in the past years and have studied horses for all my life, leaving me with a knowledge of muscle and skeleton build one might even call absurd. Henceforth I hardly ever use help lines and other guidelines to help me construct. I do this beforehand, which gives me the advantage of not only identifying basic recognition points for the breed but for the individual animal as well. So when I have decided on a composition, no matter how simplistic I put it to paper instantly, without the use of help lines except for perhaps a balance check.

If this is too hard for you to do or if you're just not sure the proportions are right, you can use some help lines to check it. Note however that the Friesian doesn't have an average shaped head, it is a bit longer and refined.
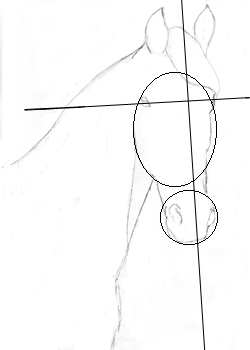
Once you're certain the basic proportions are correct, you can go ahead and begin to apply the first shadows. It is best that you follow the natural bone and muscle structure of the animal. If you don't know what the horse looks like from the inside it is very hard to draw a proper horse. There are enough books on horse anatomy to help you out with that. Sorry to say that I work differently. I have drawn so many horses that I can actually allow myself to work the wrong way around. I know how shadows work on a horse, etc. My brother calls it "Everyone can ww" (In Dutch: Iedereen kan Schilderen van Ravensburger)
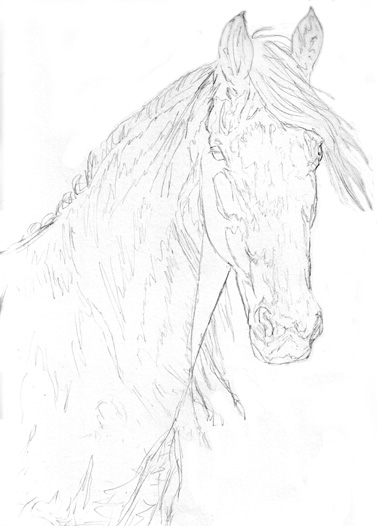
Once you've applied the initial lines, such as the bridge of the nose bone and some muscle lines in the horse's neck, you can work from there and apply more shadow lines. An example:
Make sure you use a regular pencil to apply these shades. Possibilities are: H2, H or B. You CAN use a softer one but I wouldn't advise it.
Once you begin to define these shadows you apply darker strokes of pencil. However, do NOT work too darkly at first because you can easily overdo. Begin light, as you can always make the light darker. Apply in layers, light gray, darker gray, darkest gray. And don't work the other way around because you will irrevocably ruin your drawing unless you really know what you're doing, which you don't otherwise you wouldn't be here, now would you?
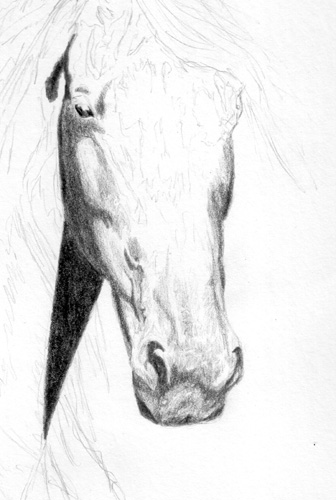
Working like this is very dangerous. See what I mean? What if the shades I have applied are too dark once I work through the rest of the drawing? I won't be able to fix it so apply soft tones in places where shadow is first. Got the idea?
After applying layer after layer your drawing finally begins to have some shape. So remember, work the darkest spots first with but a gentle shade, then apply another layer and take a less dark spot with you, applying one layer there and a second layer on the darkest spot. Go through with this until you have also applied a soft shade of gray in the lighter spots. The result can be seen above.
I would like to make clear that the way I shade is relatively rough. You don't need to work roughly if your natural style is very subtle or fine.
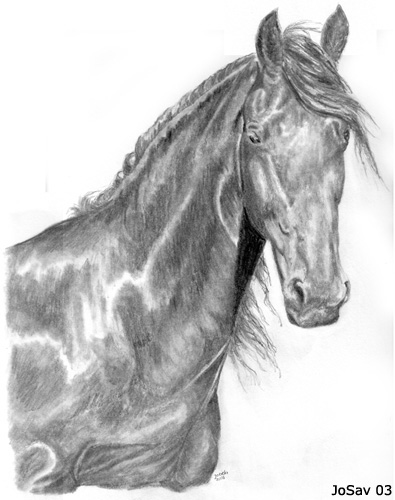
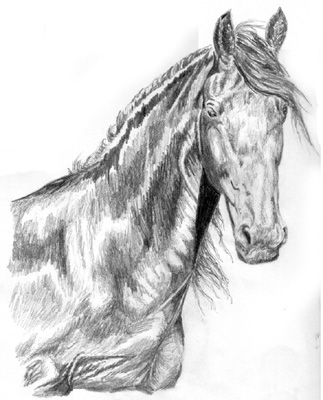
Finally, you use the stump and moldable eraser to blend in the different shades into one refined flow of tones. As you can see, my drawing turned out relatively light. Friesians are known for their pitch-black skin. So, if after a few days when I look back at this picture I think it's too light, I can always add a bit more graphite to it and darken up the drawing a bit. Remember that you can't work the other way around.
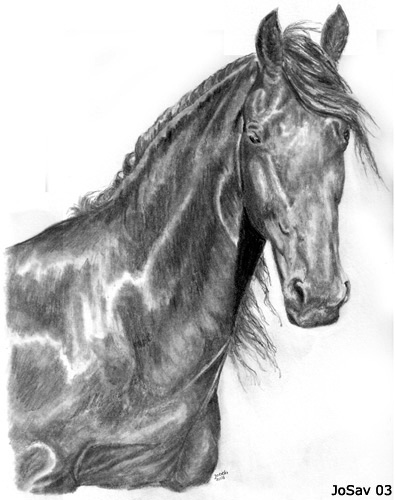
Obviously, I made it darker. Looks better now, doesn't it?
Clean up possible stains you left on the paper and voila: you just drew a horse!
Hope this was at least helpful. I am an awful teacher because I can SHOW much better than write down like this. Truth is that I couldn't possibly scan every minute I put a graphite stroke to paper, now could I?
Keep practicing!!
Also, if you want to point out something about my tutorials or if you have questions, feel free to email me about it at josav@josav.com
Back to Tutorials
Back to Sundry
Back to Main