I explained earlier shading is all about applying pressure. Yes, pressure. It doesn't matter if you use different types of pencil, it all comes down to applying pressure. I do both. I use hard and soft pencils to create the overall highlighting and shadows but to blend and make it look realistic you really need to learn how to apply pressure. With one single basic pencil, you can create dozens of different shades of grey.
This is just a basic example of what you can do with a plain B pencil. I personally hardly ever use a B pencil because I enjoy using those to write but for beginners such regular pencil is great to work with and fit to learn how to shade. Aside that, you can use virtually every pencil you can think of to shade, just by applying different pressure. Do note though that the really hard pencils haven't been created for dark shades and the really soft ones aren't fit to make highlights with.
Now I can talk about how to apply pressure but what I advise you to do is to pick up a pencil and start experimenting. You can start by trying to duplicate the shades I created in the small picture above. Just see how you can create shadows; if it turns out too light simply apply a little more pressure and if it turns out too dark just ease up already!
It is always hard to get the shade right. Know this: too much shading is a bad thing. What do I mean? If you make part of your drawing too dark you cannot change it. If you make it too light, you can simply make it a bit darker. You can always add a little more shade later on. Later on, you will be sure what should be darker and what not, you will not know this in an early stage of your drawing. No matter how experienced you are, just keep the darkness of your shading down until you can define the shape of your drawing and see what needs to be given a little more depth, in other words what needs to be darkened. Do this in a later stage of your drawing. And remember to ease up! You cannot take away too much darkness because erasing will ruin your drawing. TRUST ME: erasing will ruin your drawing.
Important: if you have difficulty with creating the exact twelve shades that I showed you earlier, place your open hand (you know, palm down, five fingers extended) on the table (or any other hard surface) next to you and apply the least amount of pressure you can think of, as if your hands are floating. Then, gently begin to apply pressure, so gently that you can feel only a little bit, then slowly, ever so slowly, you begin to increase this pressure until you simply cannot apply any MORE pressure. Do this so slowly that it takes you at the very least ten to fifteen seconds to complete. Feel all the different amounts of pressure and absorb how it feels.
As soon as this works for you, you can try doing the same with a pencil (without breaking the tip or paper of course…)
This technique is exactly what you need to be able to shade, and more than that: to blend.
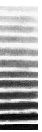
Now, I know you're wondering what I mean by blending… Look at the picture below.
All that I did was take the twelve shades of grey and draw them together. Result? The blending of shades, of highlights and shadows. Cool, huh?
Keep in mind the pressure you apply. It is essential to get a good blending of shades. Without making sure you know what you're doing and are aware of what your hand is putting on paper with the pencil it's holding, you cannot get a good blend hence can't get the realistic look I am sure you want.
I do not always use the gradual blending techniques and am well known for my 'rough' drawing style, especially when working with pencil and graphite.
Keep in mind that the better you blend, the more realistic your drawing will look.
This means that you cannot take things at random. Very light grey is not equal to white. I repeat: very light grey is NOT equal to white. Then don't apply such a thing for your drawing. All you need to do is put a very light shade of grey on your piece of paper. It's as simple and complicated as that, no different.
If you're not sure about this, leave it white for as long as you wish, abandon the drawing for a while, then get back to it and look again. Afterwards you can finish the drawing the way you think is right. And basically that depends on what you wish to do with the piece. Sell it, keep it, show it off to your relatives, just for fun... you take as long or short as you want to. Although I can't understand a person would need over two or three hours to create something decent and would take over ten or fifteen hours you can be my guest if you really want to.
When you shade and start blending, work in one direction only; apply smooth strokes to the paper. Scribbling won't work.
Ready for the next lesson?
The Meaning Of Light And Dark In Terms Of Shape
Back to Tutorials
Back to Main